
After taking thousands of bird pictures for over two years, I’ve established a series of camera settings that have given me the best results. Since conditions such as light (sunny, cloudy, or in between) are constantly changing and factors such as wind can affect where birds are located (on the ground, perched on branches or fence posts, or buried in bushes), I find camera settings need to start from a good foundation and allow for fast adjustments.
I will discuss the settings based on the Sony a6700 and Sony a7c II cameras. However, the settings are based on those familiar among many DSLR, Mirrorless, and Point-and-Shoot cameras.
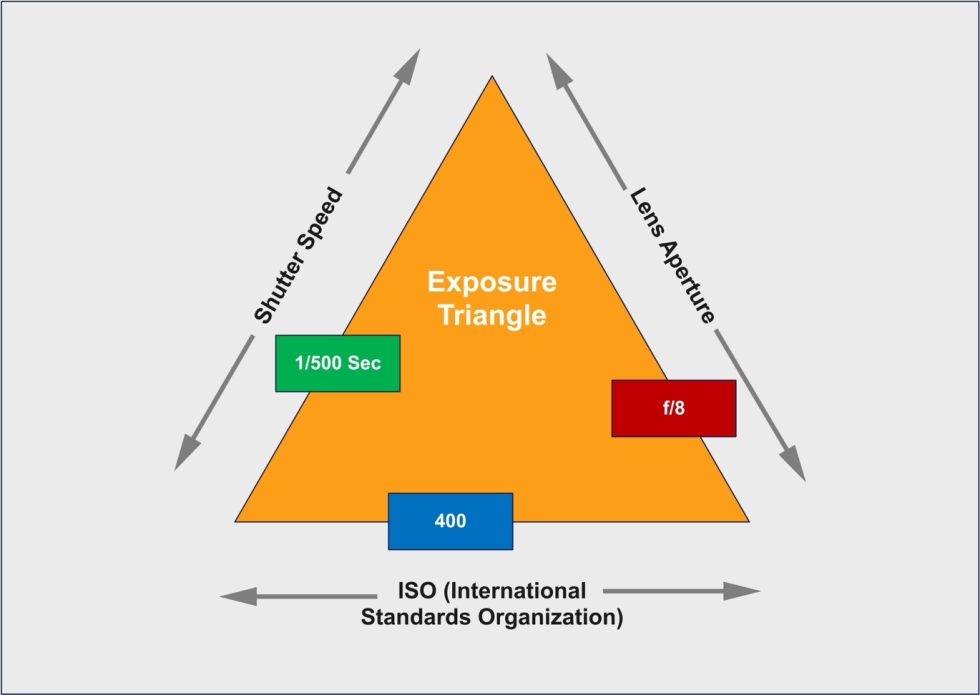
The Photography Exposure Triangle
Before I discuss settings, let’s briefly review the picture exposure triangle. When taking pictures, you must consider three essential elements: Shutter Speed, Lens Aperture, and Light Sensitivity (ISO, which stands for International Standards Organization). The exposure triangle helps optimize these elements for the best possible exposure.
Here are some examples of how the exposure triangle is used in bird photography:
Perched Bird in Good Light
• Scenario: You’re photographing a stationary bird on a sunny day.
• Settings:
• Shutter Speed: 1/500s (slow enough for a perched bird, fast enough to avoid camera shake)
• Aperture: f/8 (provides good sharpness and a slight background blur)
• ISO: 400 (low ISO for minimal noise since there’s plenty of light)
• Why: These settings provide a balanced exposure while maintaining sharpness and detail in bright conditions.
Small, Active Bird in a Bushy Area
• Scenario: A tiny, fast-moving bird like a warbler hops through branches.
• Settings:
• Shutter Speed: 1/1250s (to freeze quick movements)
• Aperture: f/7.1 (slightly narrower to maintain the sharpness of the bird and nearby branches)
• ISO: 2000 (to keep exposure balanced in potentially shaded areas)
• Why: This combination balances speed, depth, and brightness while dealing with variable lighting in dense foliage.
Bright Sky Background
• Scenario: A bird is silhouetted against a bright sky.
• Settings:
• Shutter Speed: 1/1600s (to capture details if the bird is moving)
• Aperture: f/6.3 (wide aperture to counter the bright background)
• ISO: 800 (compensates for potential underexposure)
• Exposure Compensation: +0.7 (brightens the bird to counter the camera’s tendency to darken the image due to the bright sky)
• Why: These settings ensure the bird is well-exposed against the bright background without losing detail.
The Basic Camera Settings I Use For Bird Photography
CAMERA MODE: Your camera’s Automatic Mode evaluates a scene and uses the exposure triangle to calculate the shutter speed, lens aperture, and sensor sensitivity to light (ISO). As you can see in the examples, there are many things to consider when photographing birds in different settings. Auto Mode can’t consider all of them and will often give you improperly exposed pictures.
Because of this, I use either Manual or Shutter Speed Priority Mode on my Sony a6700 and a7c II cameras. In either case, the Shutter Speed, in my opinion, shutter speed is the most critical factor when photographing birds.
SHUTTER SPEED: I start with a shutter speed of 1/500 a second and modify it. I can adjust my camera’s lens aperture in most lighting situations to get a reasonably good exposure. In lower light, I’ll reduce the shutter speed to 1/400 or 1/320 of a second, but I will work to keep it as high as possible.
LENS APERTURE: I use a starting lens aperture of f/6.3 (the widest allowed by my Sigma 150mm to 600mm lens). As the lens aperture value increases, the light reaching the camera sensor decreases. For example, a lens with a maximum aperture of f/2.0 will let in more light than a lens with a maximum of f/4.0.
ISO: Most of the time, the starting ISO setting is usually “Auto.” As I change the shutter speed or lens aperture, the ISO value adjusts the light sensitivity of the camera sensor to ensure proper exposure. I’ve experimented with manually changing the ISO as I’m shooting pictures and found I get better results using “Auto” on my Sony Cameras.
Other Important Camera Settings To Consider
In addition to the exposure settings, I use the following settings to help me track and get sharper pictures of birds.
METERING MODE: I start the day with my cameras set to SPOT Metering. Depending on the lighting conditions and the birds I’m tracking I may adjust this to CENTER or MULTI Mode.
FOCUS MODE: In most cases, I use the Auto Focus C (continuous) camera setting for bird photography. My Sigma lens will be set to Auto Focus as well. I may use Manual Focus on my lens for challenging situations, as I did when photographing an owl perched in a large pine tree or a nesting red-tailed hawk. Small branches impacted the autofocus, so I used the Manual Focus lens to get a sharp picture.
SUBJECT RECOGNITION: The Sony a6700 and a7c II cameras have good (in my experience) subject recognition, and I leave this set to BIRD unless I’m taking pictures of other subjects.
Bird Photography Camera Settings Summary
Here’s a summary of the starting camera settings I check for each time I head out to take pictures of birds:
- Camera Mode - Manual or Shutter Speed Priority
- Shutter Speed - 1/1000th of a second
- Lens Aperture - f/6.3
- ISO - Auto
- Metering Model - Spot
- Camera Focus Mode - Autofocus Continuous
- Lens Focus Mode - AF (autofocus)
- Subject Recognition - Bird
I hope this is helpful for you getting started with bird photograpy!